Thursday, October 19, 2017

Pokémon Egg


Here is what I did to make my egg.  

Notes:
-          This pattern is worked completely in the round; do not join after any round. 
-          Round 6-9, and 12 you don’t need to be super precise, just increase twice on each of those rounds.  Try to stagger them a bit though. 
-          The spots are pretty customizable.  I’ve included a few ideas, but there are many more options. 

Materials:
-          Red Heart Super Saver in two colors, sample in Aran and Guava
-          Size F crochet hook
-          Tapestry needle
-          Polyfill or other stuffing

Directions:
Round 1:  ch2, 6 sc in second ch from hook do not join (6)
Round 2:  [sc, sc, 2sc] x2 (8)
Round 3:  [sc, 2sc] x4 (12)
Round 4:  [sc, sc, 2sc] x4 (16)
Round 5:  [sc, sc, sc, 2sc] x4 (20)
Round 6:  sc next 5, 2sc, sc next 9, 2sc, sc next 4 (22)
Round 7:  sc next 2, 2sc, sc next 10, 2sc, sc next 8 (24)
Round 8:  2sc, sc next 11, 2sc, sc next 11 (26)
Round 9:  sc next 6, 2sc, sc next 12, 2sc, sc next 6 (28)
Round 10:  sc around (28)
Round 11:  sc around (28)
Round 12:  sc next 3, 2sc, sc next 13, 2sc, sc next 10 (30)
Round 13:  sc around (30)
Round 14:  sc around (30)
Round 15:  [sc, sc, sc, sc2tog] x6 (24)
Round 16:  [sc, sc, sc2tog] x6 (18)
Make sure to stuff your egg now if you haven’t yet
Round 17:  [sc, sc2tog] x6 (12)
Round 18:  sc2tog around (6)
Cut yarn leaving a good sized tail to sew the hole closed. 


Spot #1  (small, round)
Round 1:  ch 2, 6sc in 2nd ch from hook (6)
Cut yarn and bind off

Spot #2 (bigger, round)
Round 1:  ch 2, 6sc in 2nd ch from hook (6)
Round 2:  2sc around (12)
Cut yarn and bind off

Spot #3 (bigger, oval)
Round 1:  ch 2, 6sc in 2nd ch from hook (6)
Round 2: 2sc, [sc, hdc] in next st, 2hdc, [hdc, sc] in next st, 2sc, 2sc (12)
Cut yarn and bind off

Spot #4 (small, oval)
Round 1:  ch 2, [sc, hdc, dc, dc, hdc, sc] in 2nd ch from hook (6)
Cut yarn and bind off

Spot #5 (bigger, irregular)
Round 1:  ch 2, 6sc in 2nd ch from hook (6)

Round 2:  2sc, 2hdc, 2sc, [hdc, dc] in next st, [dc, hdc] in next st, 2sc

Friday, February 17, 2017

Spinning and Dyeing

I've had a lot of fun lately with my newest fiber arts.  I have two drop spindles and I really like spinning.  It is quite relaxing and I am really looking forward to getting a wheel.  I'm trying to decide if I should go through the hassle of getting my Dad to make me one, or just go ahead and buy one.  If I do end up buying one, it will most likely be an Ashford Kiwi, but I really like the look of another wheel called a ladybug.  

So I have made two 100 gram skeins of yarn using my drop spindles so far.  The first was a 100% wool and the yarn I got was probably comparable to a chunky yarn on average.  I made a two ply by making a ball with both ends held together.  When I was finished spinning, I found a cowl pattern and decided to dye my 
                                                      yarn a purple color.  It has bits of 
                                                      red and blue too though.  


My second skein was from 80/20 merino/nylon.  It is also a two ply using the same method and is somewhere around the dk/worsted category.  I haven't done anything with this one yet, although I think it would make a good hat when I find the right pattern.  

Halfway through this spinning project, I finally got a hook put on the end of the spindle and boy did that speed things up.  By the end, I was getting  a lot more confident and decided I wanted to do more spinning.  


Then I ordered a fiber sampler from essential fiber and it has been interesting so far.  I love looking at all the colors and petting them.  I started with the red sample as you do, and went from there.  I have only finished three as I don't want to binge and then be sad when its all gone.  Also, I'm a bit nervous about the more slippery samples that are towards the end of the rainbow.  


The past week I have decided to spin some fiber that I dyed a while back.  It is mostly still bare with patches of royal blue to sky blue.  It looks kinda funny as singles, because there is still a lot of white, but I hope it will kinda even out when I ply it.  i can't decide if I want to chain ply it, or if I would rather have a thinner yarn, so a two ply.  

As far as dying goes, I have tried several different techniques and have been pretty successful except for this bit of roving that seems to be infected by bad luck.  I dyed it a while back and the colors kinda broke and blended and I got a lot of white spots, so I tried acid dyes for the first time today and overdyed the entire bunch with emerald green.  It looks like I didn't put enough vinegar in, so a lot of the blue color washed out when I rinsed it.  After rinsing for a while I decided to cook it in the microwave again with some more vinegar hoping to set the dye better.  Its still quite hot now, but hopefully it will help.  


Recent Projects

Its been a while since I have had any new patterns to share, so I though I would share some of my recent projects that I did use patterns for.

Here is an afghan I worked on for about a year.  I joined the 2016 BAMCAL last February and that led me to the goodness that is ravelry.  I love being able to share my projects, ask questions and even help others occasionally.  I'm excited to start the next one, and I'm thinking I will make it with solid colored blocks randomly placed.

Testing patterns for other people has also been fun.  That led me to the Rav group HPKCHC.  It is a really fun way to motivate yourself to finish projects and also a great place to talk to others.

In Nov/Dec, I got hit by the hexipox.  I saw the Beekeepers quilt and had to have one.  The little puffs are also great as turn-ins for HPKCHC.  I've made 12 so far with hundreds to go, but Its not a priority for me, just a quick bit of knitting that I can take along to places.

The House Cup has also motivated me to finish some larger projects.  I have made 6 pairs of socks now, a Hitchhiker shawl and I'm working on another shawl with a lot more lace than I have attempted before.  


These two pair are probably my favorites that I have made.  The blue/grey stripey ones are Time Traveler socks, and the Grey are Blackrose socks.  There are pictures of the other ones on my projects page on Rav.  The best part is that all the patterns I used were free except for the FLK heel.
I did recently make a new thing though.  My mom wanted a towel topper, so I did a bit of research on how they are started, and then I figured out the rest myself.  I wrote down my process, so I might try and type it up sometime.  If there is any interest, I would be happy to put it here for free.  To see a picture, click the link.


Monday, July 25, 2016

Football Baby

Recently I made a football hat, diaper cover, and ball for a friends baby.   I wrote up the pattern and you can now find it on ravelry here.  I think it turned out pretty cute, and it should fit a newish baby, somewhere around the newborn to 0-3 months area.


Saturday, May 28, 2016

Little Minion

Minion Hat Pattern


I designed this outfit for my cousin.  I already posted the overalls, but now here is the hat and add-ons to make a little minion outfit.  Pattern makes a size 3 month hat, add another round of increases following the pattern to get larger sizes.  I would love to see this in blue for a little boy minion 

Materials: 
o   Worsted weight yarn, I used I love this yarn in yellow and pink, caron simply soft black and white, and Red heart with love brown
o   G hook
o   Tapestry needle
o   scissors


Hat: 
Begins with yellow 
The ch 1 at beginning of each round does not count as a st.  Always join to the first hdc. 
Round 1:  Ch 2, 7 hdc in 2nd ch from hook, Join to first hdc (7)
Round 2:  Ch 1, 2 hdc in same st as join, 2hdc in each st around, join to first hdc (14)
Round 3:  Ch 1, Hdc in same st as join, {2hdc in next st, hdc in next st}6 times, 2 hdc in next st, join, (21)
Round 4:  Ch 1, Hdc in same st as join, hdc in next st, {2hdc in next st, hdc in next 2 sts}6 times, 2 hdc in next st, join, (28)
Round 5:  Ch 1, Hdc in same st as join, hdc in next 2 sts, {2hdc in next st, hdc in next 3 sts}6 times, 2 hdc in next st, join, (35)
Round 6:  Ch 1, Hdc in same st as join, hdc in next 3 sts, {2hdc in next st, hdc in next 4 sts}6 times, 2 hdc in next st, join, (42)
Round 7-8:  Ch 1, hdc same st as join, hdc around, join (42)
Switch to black yarn
Round 9-11:  Ch 1, hdc same st as join, hdc around, join (42)
Switch to yellow yarn
Round 12-16:  Ch 1, hdc same st as join, hdc around, join (42)
Switch to pink yarn
Round 17:  Ch 1, sc in same st as join, sc around, join (42)
Weave in all ends. 

Eyes: 
Start with Black yarn
Round 1:  Ch 3, 12 Dc in third ch from hook, join to top of first dc. (12)
With Brown yarn
Round 2:  Standing sc in any st, {2 sc in next st, sc in next st} 5 times, 2 sc in next st, join to first sc. (18)
With white yarn
Round 3:  Standing dc in any st, {2dc in next st, dc in next st} 5 times, 2 dc in next st, join to first sc. (18)
Switch to grey yarn
Ch 1, standing sc in any st, sc in next st, {2sc in next st, sc in next 2 sts} 5 times, 2sc in next st, join to first sc.  (24)  You want this last row to be more on the front of the eye rather than the edge, it make it more like a frame. 
Cut yarn leaving tail long enough to attach eye to hat. 

Bow: 
With pink yarn
Ch 4, 3 tr in fourth st from hook, ch 3, sl to first ch again, ch 3, 3 tr in first ch again, ch 3, sl to first ch again, bind off leaving a tail long enough to wrap around the middle of the bow and to attach it to the hat. 

Hair: 
Cut black yarn in pieces around 4 inches, attach hairs where you choose, using a latch-hook technique.  Find the right spot, insert hook under a st in the hat from the outside to the inside and back to the outside.  Find the middle of your short piece of black yarn.  Grab the middle with your hook and pull in through about 1-2 cm.  With your fingers or the hook, take the two ends and pull them through the loop and tighten it down.  This isn’t a particularly permanent method, but it keeps the little hairs in line. 

Face: 
After attaching hair, eye, and bow, cut a piece of black yarn and embroider the mouth and eyelashes. 

Logo: 
With black
Round 1:  Ch 2, 8 sc in 2nd ch from hook,
Round 2:  Ch 1, 2 sc in each st around
Use pink yarn and embroider a “G”

Pocket: 
With Pink yarn
Row 1:  Ch 12,  dc in fourth ch from hook, dc in each ch across,  turn (10)
Row 2-7:  Ch 2, dc in each st across, (10)
Sl st around the outside to form an even boarder.  
Cut yarn leaving a long tail to sew the pocket on. 

Thursday, May 26, 2016

Baby Girls Bow Sandals


I made this pair for one of my cousin's first birthday, for pictures.


Click Here for the Ravelry link.


This pattern allows you to make a cute pair of sandals that any baby would love.
Size: 
These sandals are similar to an size 3.5 or 4 shoe, and Made for a 12 month baby 
Worker in a different yarn these may turn out a little larger, as simply soft is at the smaller end of the worsted category.
Finished sole measures 4.25 inches, or 10.8 cm.
Materials:
o worsted weight yarn in one or two colors, I used caron simply soft in watermelon and black 
o G Hook 
o Blunt needle for weaving in ends 
o Scissors 
o Two small buttons

Thursday, March 3, 2016

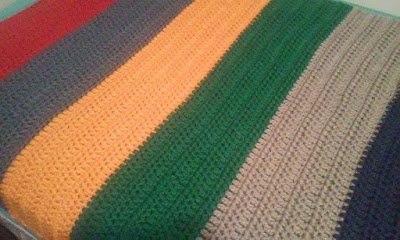
Boy Stripes Toddler Crochet Blanket


This blanket can be made very fast and is very warm.  I made it for my nephew to go with his avengers themes room so that is why I chose the colors, Cincinnati Red, Washington Denim, Atlanta Apricot, Dallas Grey, Fort Worth Blue, and Grand Rapids Green in Lion Brand Hometown USA.  There are many other colors to choose from though.
 
 Materials:
12 or more skeins Bulky (5/6) yarn in 6 colors
Crochet hook size N
Large eye needle for fixing ends
Tape measure
Scissors

Pattern:
Row 1: Make a simple chain about 40 inches long.  Hold yarn loosely so this end won’t be too tight, ch2 more,
Row 2:  Dc in third ch from hook.  Dc in every ch across.  You may want to measure again to make sure it isn’t more than 40 inches.
Row 3-10:  Ch 2, turn,  Dc in every st across (ch 2 always counts as dc)
Change to second color
Row 11-19:  Ch 2, turn,  Dc in every st across (ch 2 always counts as dc)
Change to third color
Row 20-28:  Ch 2, turn,  Dc in every st across (ch 2 always counts as dc)
Change to fourth color
Row 29-37:  Ch 2, turn,  Dc in every st across (ch 2 always counts as dc)
Change to fifth color
Row 38-46:  Ch 2, turn,  Dc in every st across (ch 2 always counts as dc)
Change to sixth color
Row 47-55:  Ch 2, turn,  Dc in every st across (ch 2 always counts as dc)
Finish off, or change to another color and continue in the same way.
I only had enough yarn to do nine dc rows, so that’s how many I did, but if you have 3 skeins of each color you could make your stripes 14 or 15 rows.